Useless Arduino Hacking
I recently bought an Arduino Uno kit with an Ethernet shield and a LCD output. So far it has been a lot of fun tinkering around with. My first 'useful' project was to take the example system they gave to display a temperature reading from a thermal transistor and hook it up to the internet so that I could call in and check the temperature remotely.
In this project I used an Arduino Uno Rev3 board, an Arduino Compatible Ethernet Shield R3, a MySQL database and a couple of PHP scripts to get/set the temperature, and lastly I have a Twilio account to handle generating a voice message when you call into a number.
You can find all of the necessary code on github here. We'll start with the hardware set up. This is pretty much the same thing as Circuit 7 on the Vilros Ultimate Starter Kit Guide, circuit #7. The difference is that I'm using the Ethernet shield and I'm using a different analog pin because pin 0 is used by the shield.
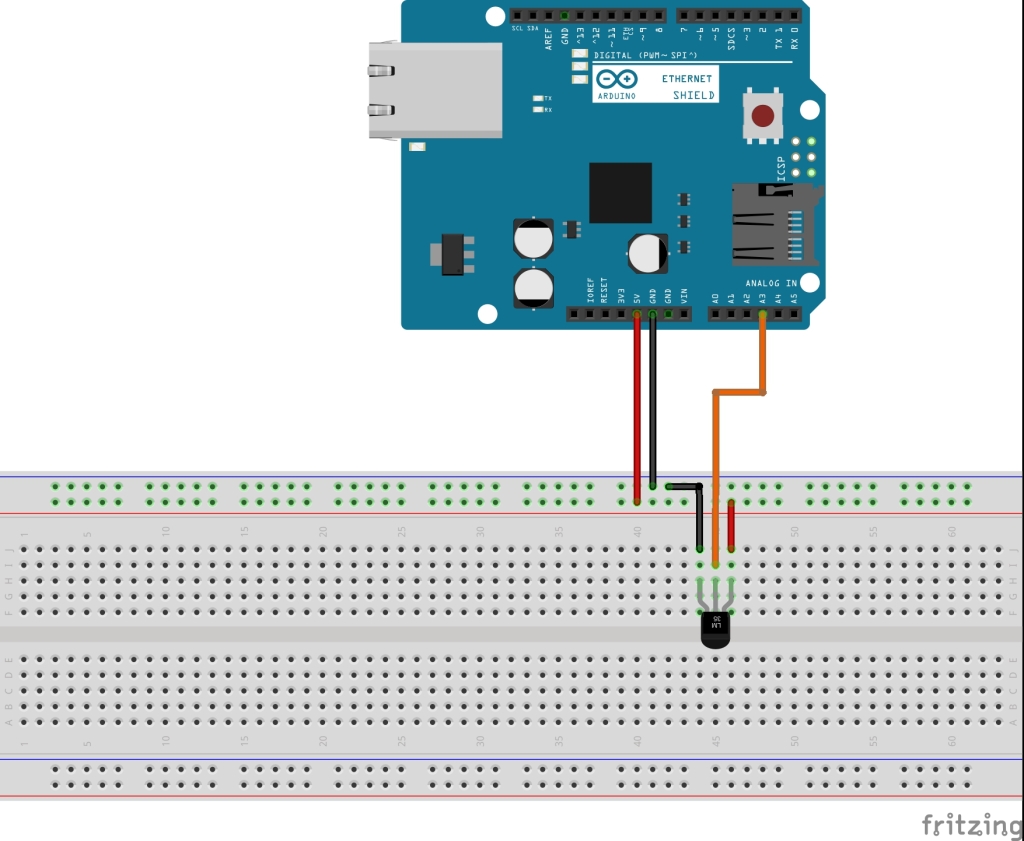
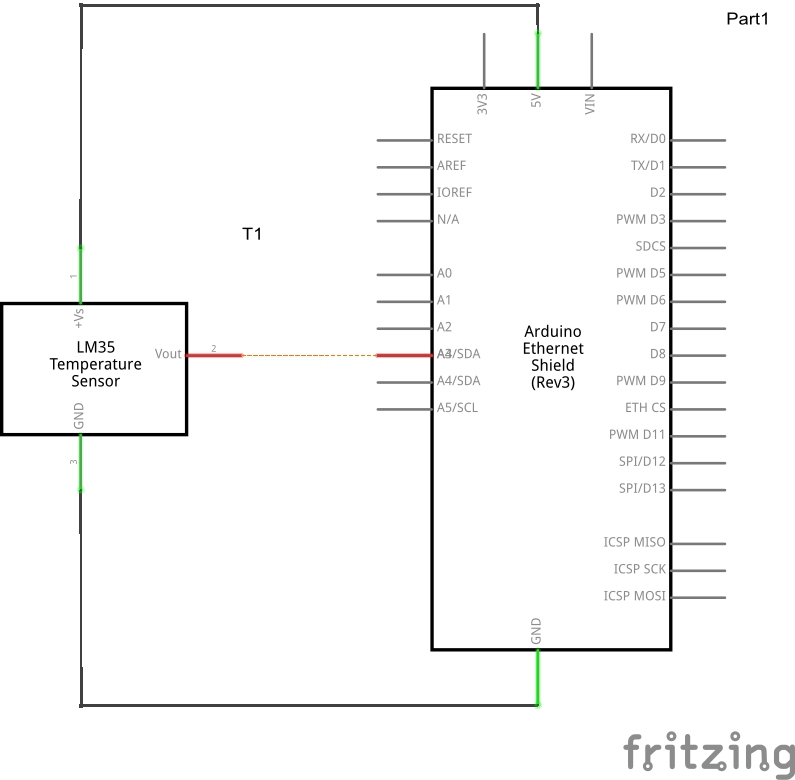
The above pictures should be self-explanatory. We hook the transistor up to our +5v and ground. Because of the doping and several tiny elves working on even tinier computers, the transistor will allow different voltages out to analog 3 depending on the temperature.
Next we'll examine the code. Rather than pasting it here, you can check it out at this link. This code consists of the Circuit 7 Example code, and the Ethernet web client code combined. It's important to note that the fall-back IP address constant should be set to an address on your subnet, otherwise you won't be able to make connections out.
There are two main functions used in all Arduino programs: void setup() and void loop(). Like their names imply, setup() is used to set some initial variables and get things going. Loop continues to run while the board is plugged in. We're also using two additional functions void httpRequest(float temperature), and float getVoltage(int pin). getVoltage() reads the input from a particular pin and uses some arithmetic to convert that to a meaningful number representing degrees fahrenhiet. httpRequest(float temperature) send a GET request to "/settemp.php?temp=temperature". This is our php script that we'll cover next. The code is well commented, so rather than go into a detailed analysis I'll break down the steps that we're taking in this program:
- Initialize the Ethernet shield
- Read temperature input
- Send GET request to external server, passing that temperature as a parameter
- Read response from server
- Go to step 2
Next we're going to create a database that we can store this information in. It has the following schema:
CREATE TABLE temperature (
id int(11) NOT NULL AUTO_INCREMENT,
temperature float NOT NULL,
PRIMARY KEY (id)
)
We're going to use two very simple scripts (this could be consolidated to one script, but to make it easier/more obvious to lock down the temperature setting I pulled this out to be it's own file). The first script we'll examine is the temperature setter (settemp.php):
<?php
// define your own mysql credentials in include.php
require_once('../include.php');
// set this to the IP address of your network
if ("YOURIPADDRESS" != $_SERVER['REMOTE_ADDR']) {
die();
}
$mysqli = new mysqli($host, $username, $password, $database);
$statement = $mysqli->PREPARE("INSERT INTO temperature (temperature) VALUES (?)");
$statement->bind_param("d", $_GET['temp']);
$statement->execute();
?>
OK
This is just a very simple script that takes the temperature as a get variable and saves that to the database. There's also a check before updating the database to block all IP addresses but the one you specify. The idea is that you don't want random people updating the temperature. At the end it prints OK, this was included strictly for debugging purposes.
Next we need to pull that temperature out of the database in a meaningful way (gettemp.php):
<?php
// define an include file and set your mysql credentials
require_once('../include.php');
$mysqli = new mysqli($host, $username, $password, $database);
$return = $mysqli->query("SELECT * FROM temperature ORDER BY id DESC");
$row = $return->fetch_assoc();
header("Content-Type:text/xml");
?>
<Response>
<Say voice="woman" loop="10">The current temperature in Your room is <?php echo $row['temperature']; ?> degrees. The current date and time is <?php echo date("F j, Y, g:i a", strtotime('+2 hours', time())); ?>.</Say>
</Response>
This uses TwiML which is an XML format that Twilio can interpret. It's very easy to work with and you can find more information about it at this link.
The next step is to point your Twilio number to your script. You can do this by selecting 'numbers' in the menu, clicking on the number you want to edit, and changing the voice 'Request URL' here:

After that, all that's left to do is to hook the Arduino up to your router and power it on. You can check the output in the serial monitor and see when it makes the get requests. Hopefully this can server as an example for rigging up near-useful systems with your Arduino. I look forward to doing more projects and documenting them here. If you have any questions or comments email me at jonathonklem@gmail.com.